How to Share a Sketch in Autodesk Inventor
INTRODUCTION
For sketched features to be created, Autodesk Inventor require visible sketches. And more often, a sketch could contain geometry and loops that can be reused across many features. After the first sketch feature is created, the sketch is consumed by that feature and must be shared if other features must have access to the sketch. Sharing of sketches in the simplest way of reusing sketches and saving lots of time.
I hope you learnt a lot from this lesson. If you have any questions, please drop a comment, and I will answer ASAP. Thank you.
OBJECTIVES
At the end of this lesson, the reader should be able to:- Create a simple sketch in Autodesk Inventor,
- Constrain the sketch with dimensional and geometric constraints,
- Create an Extrusion feature, and
- Share an existing sketch.
SHARING A SKETCH IN AUTODESK INVENTOR
CREATING THE SKETCH GEOMETRY
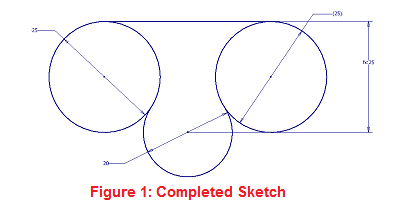
Let's begin this section by drawing a simple sketch with Inventor. Do the following (refer to Figure 1 for the completed sketch):
- Launch Inventor. When Inventor is open, click CTRL + N, to launch the New File dialog box.
- Go to the Metric tab of the New File dialog box, and select Standard (mm).ipt template. Click OK to create a new part file.
- Press C to start the Circle tool. Create a circle of diameter 20mm that is centered on the sketch.
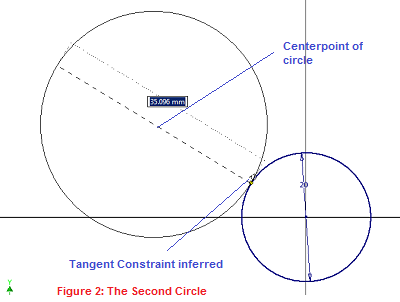
- Start another circle that is centered on the upper-left side of the first circle (Refer to Figure 2). Draw the circle towards the circumference of the first circle. A tangent constraint is inferred. Click the circumference of the first circle while the glyph is still showing.
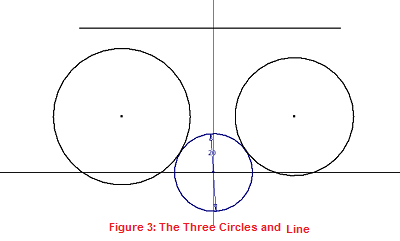
- Repeat step 4 and draw another circle centered at the upper-right side of the first circle. (Refer to Figure 3 for guidance.)
- Press L to launch the Line tool. Create a horizontal line above the two top circles.
CONSTRAINING THE SKETCH
- Now, on the Sketch tab > Constrain panel, launch the Coincident Constraint tool.
- Click the left endpoint of the line and click the left circle.
- Repeat step 8 for the right circle.
- On the Sketch tab > Constrain panel, launch the Tangent Constraint tool.
- Click the line and the left circle.
- Repeat step 11 for the right circle.
- On the Sketch tab > Constrain panel, launch the Equal Constraint tool.
- Click the left and right circles.
- Press D to launch the Dimension tool. Click the left circle. Apply a dimension of 25 mm.
- Click the line and the centerpoint of the center circle. Click the 25-mm dimension that was applied to the left circle. Press Enter. A reference dimension is created.
- The status bar should be displaying "fully constrained."
- On the Sketch tab > Modify panel, launch the Trim tool. Click the inner segment of the center circle to trim it off. (Refer to Figure 1 for guidance).
- Press S to exit the sketch environment. Save the file.
CREATING THE EXTRUSION FEATURE
- At the upper-right corner of the Graphics Area, click the Home icon on the Viewcube.

- Press E to launch the Extrude tool. The Extrude dialog box is displayed. The sketch has three closed profiles (or loops). So Inventor can not automatically select anyone for you. Select all the three profiles. Note that you can remove a profile by holding down CTRL and reselecting the profile.
- On the Shape tab > Extents area, type 10mm as the height of extrusion.
- Click OK to create the Extrusion1 feature (confirm the name from your Model Browser). Sketch1 is now consumed by Extrusion1.
SHARING SKETCH1
- On the Model Browser, expand the Extrusion1 feature. Sketch1 is seen to be located under Extrusion1.
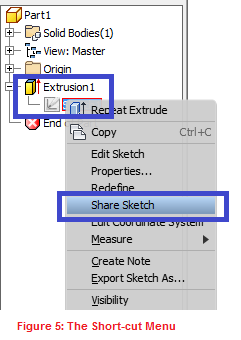
- Right click Sketch1. On the shortcut menu, click Share Sketch. (See Figure 5)
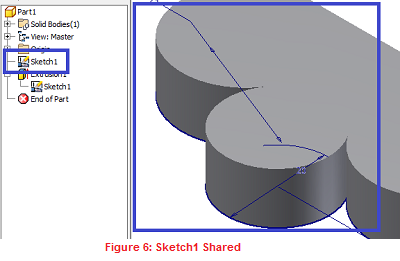
- Sketch1 is shared and is now added as a first-level object on the Model Browser. (See Figure 6).
- Click the Home icon on the Viewcube. (See Figure 4).
- On the Navigation bar, launch the Orbit tool. (See Figure 7)

HOT TIP: You can also execute the Orbit tool by Holding down the Shift key and Press and drag the mouse wheel on a 3-button mouse.
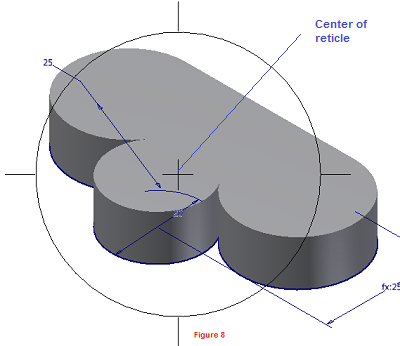
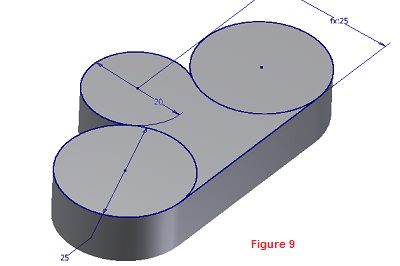
- Click and drag the center of the reticle ( See Figure 8) and reorient the model to appear as shown in Figure 9
CREATING ANOTHER EXTRUSION FEATURE
- Press E to launch the Extrude tool. Sketch1 has been shared, so we reuse it for creating another sketched feature.
- Click the central profile, and use 20 mm as the height of extrusion. Click the direction 2 button to flip the direction upwards if it's directed downwards.
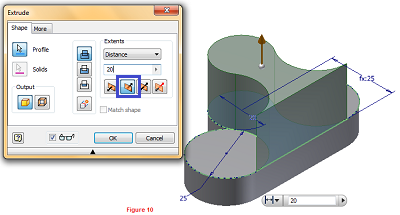
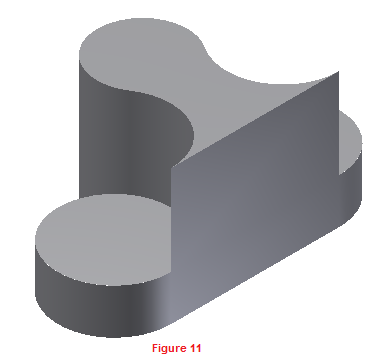
- Click OK to finish the Extrusion2 feature.
- Right click Sketch1 on the Model Browser, and click Visibility to turn off the visibility of the sketch. Save the file.
- The model is completed.
I hope you learnt a lot from this lesson. If you have any questions, please drop a comment, and I will answer ASAP. Thank you.
0 komentar:
Posting Komentar