PLATFORM: AUTODESK INVENTOR PROFESSIONAL 2011/2012/2013
LEVEL OF DIFFICULTY: BEGINNERS
AUTHOR: NDIANABASI UDONKANG
This is a continuation of the series of lessons for new Inventor Users. Check out this blog's table-of-content page for more topics in this series
TOPIC: USING THE FILLET TOOL - part 2
BEFORE YOU BEGIN
- Download the dataset. The dataset files were created with Inventor 2011 to ensure compatibility with newer versions of Inventor.
- Save it to a project folder of an existing Inventor project. Set the project active. Learn more about Inventor Projects and Project Files.
- If there is any concept you do not understand, check out previous lesson: USING THE FILLET TOOL (FILLET FEATURE) - OVERVIEW.
INTRODUCTION
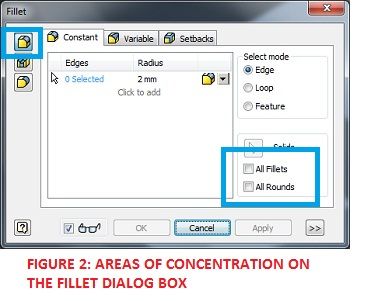
The Fillet tool can be used for creating various types of fillets/rounds. One of them is the constant-radius fillet. The constant-radius fillet applies only one radius at a time on any particular edge. To speed things up while creating fillets or rounds, we are going to learn how to use the All Fillets and All Rounds selection modes. The All Fillets mode allows you to select all interior edges on your part so that you can quickly apply fillets to them, while the All Round mode allows you to select all exterior edges on your part so that you can quickly apply rounds to them.
This lesson is a sequel to USING THE FILLET TOOL (FILLET FEATURE) - OVERVIEW. Endeavour to read it before continuing here.
OBJECTIVES
At the end of this lesson, the reader should be able to:- Describe and create a constant-radius edge fillet,
- Describe and create an edge fillet using the All Fillets selection mode,
- Describe and create an edge fillet using the All Round selection mode.
LOCATING THE FILLET TOOL
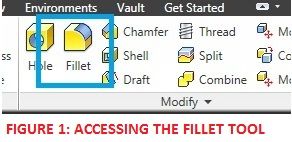
The Fillet tool could be found on:- RIBBON: Model tab > Modify panel > Fillet

- SHORTCUT: F
procedures for creating a constant-radius fillet
In this section, we are going to learn how to create a constant-radius fillet.
- Open the dataset file, constant_radius_fillet.ipt
- Press F on your keyboard to launch the fillet tool. The Fillet dialog box is displayed (see Figure 3).

- We are going to round all the edges on the top face of the part. On the Fillet dialog box > Constant tab and under Radius column, click 2mm. Type 20mm and press Enter. This sets 20mm as the new fillet radius.
- Now click on all the edges on the top face of the part, one after the other. You model should resemble the Figure 5 below. The dialog box (see Figure 4) indicates that 6 edges have been selected.


- Click OK to create the Fillet (see Figure 6).

ALTERNATIVE METHOD
This is an alternative and faster method to the one above.- Launch the Fillet tool.
- On the Fillet dialog box, set the radius to 20mm.
- On the right-hand side of the Fillet dialob box, set the Select Mode to "Loop."
- Point at one of edges on the top face, and ensure that it highlights the top face. When the top face is highlighted, click.
- Press OK to create the fillet.


REFERENCE
1. Autodesk Inventor 2010: Official Training Courseware.
0 komentar:
Posting Komentar